Project Archon
Operation Siren
Building a contained, high-interaction honeypot for threat intelligence research
Download the Writeup (DOCX, ~2 MB)
Sanitized for public release
Public IPs, cryptographic keys, internal addressing, hostnames, ports beyond the exposed service, account names, credentials, and software build numbers have been removed or generalized. Nothing here identifies the live sensor.
TL;DR
Operation Siren is a bare-metal threat intelligence lab built entirely on free tools. A free-tier cloud VM holds the only public IP and forwards attacker traffic over an outbound WireGuard tunnel to a home Proxmox host. There, an OPNsense firewall delivers it to a real, deliberately weak Ubuntu server on an isolated bridge. Every login, command, process, file change, and packet is captured at the host and network layers and shipped one way into Splunk. The honeypot cannot reach the home network, the management plane, the SIEM interface, or the real internet. That containment was proven with a formal go/no-go gate before anything was exposed.
The lab is live and collecting. The goal is original CTI: Diamond Model reports, YARA and Sigma detections, and ATT&CK-mapped findings.
Why Build This
Most of what a defender reads about attacker behavior is secondhand. I wanted my own evidence: real sessions, real payloads, and real tradecraft that I captured, preserved, and analyzed myself.
Low interaction vs. high interaction. A low-interaction honeypot emulates a service. It answers a banner, maybe accepts a login, and logs the attempt, but there is no real system behind it. It is safe and cheap, and it tells you little beyond "someone scanned you."
A high-interaction honeypot is a real operating system that the attacker fully compromises. You see the commands they run, the tools they pull down, and how they try to persist and pivot. You learn far more. The trade-off is that you are now running a compromised host on purpose, so containment and evidence handling are the core of the build, not an afterthought.
Goals
- Capture full attacker activity: network traffic, process execution, file changes, logins, privilege escalation, persistence, and outbound attempts.
- Contain every attacker to the honeypot. No path to the home LAN, and no ability to attack third parties.
- Preserve dropped files and volatile memory as evidence before any revert.
- Operate at zero software cost using free tools and free cloud tiers.
Planned Outputs
- CTI reports written to the Diamond Model, one per significant activity cluster.
- YARA rules for captured samples and Sigma rules for observed behavior.
- Portfolio posts and a conference talk built from the findings.
Architecture
The lab is built in zones that become less trusted as you move toward the attacker. Attack traffic flows in from the internet, through the cloud edge, across the tunnel, into the firewall, and only then to the honeypot. Telemetry flows the other way into the SIEM. The home LAN is reachable from none of it.
The HONEY, SIEM, and MIRROR bridges have no physical network port. The firewall is the only device that can route between them, and the only thing that can route out.
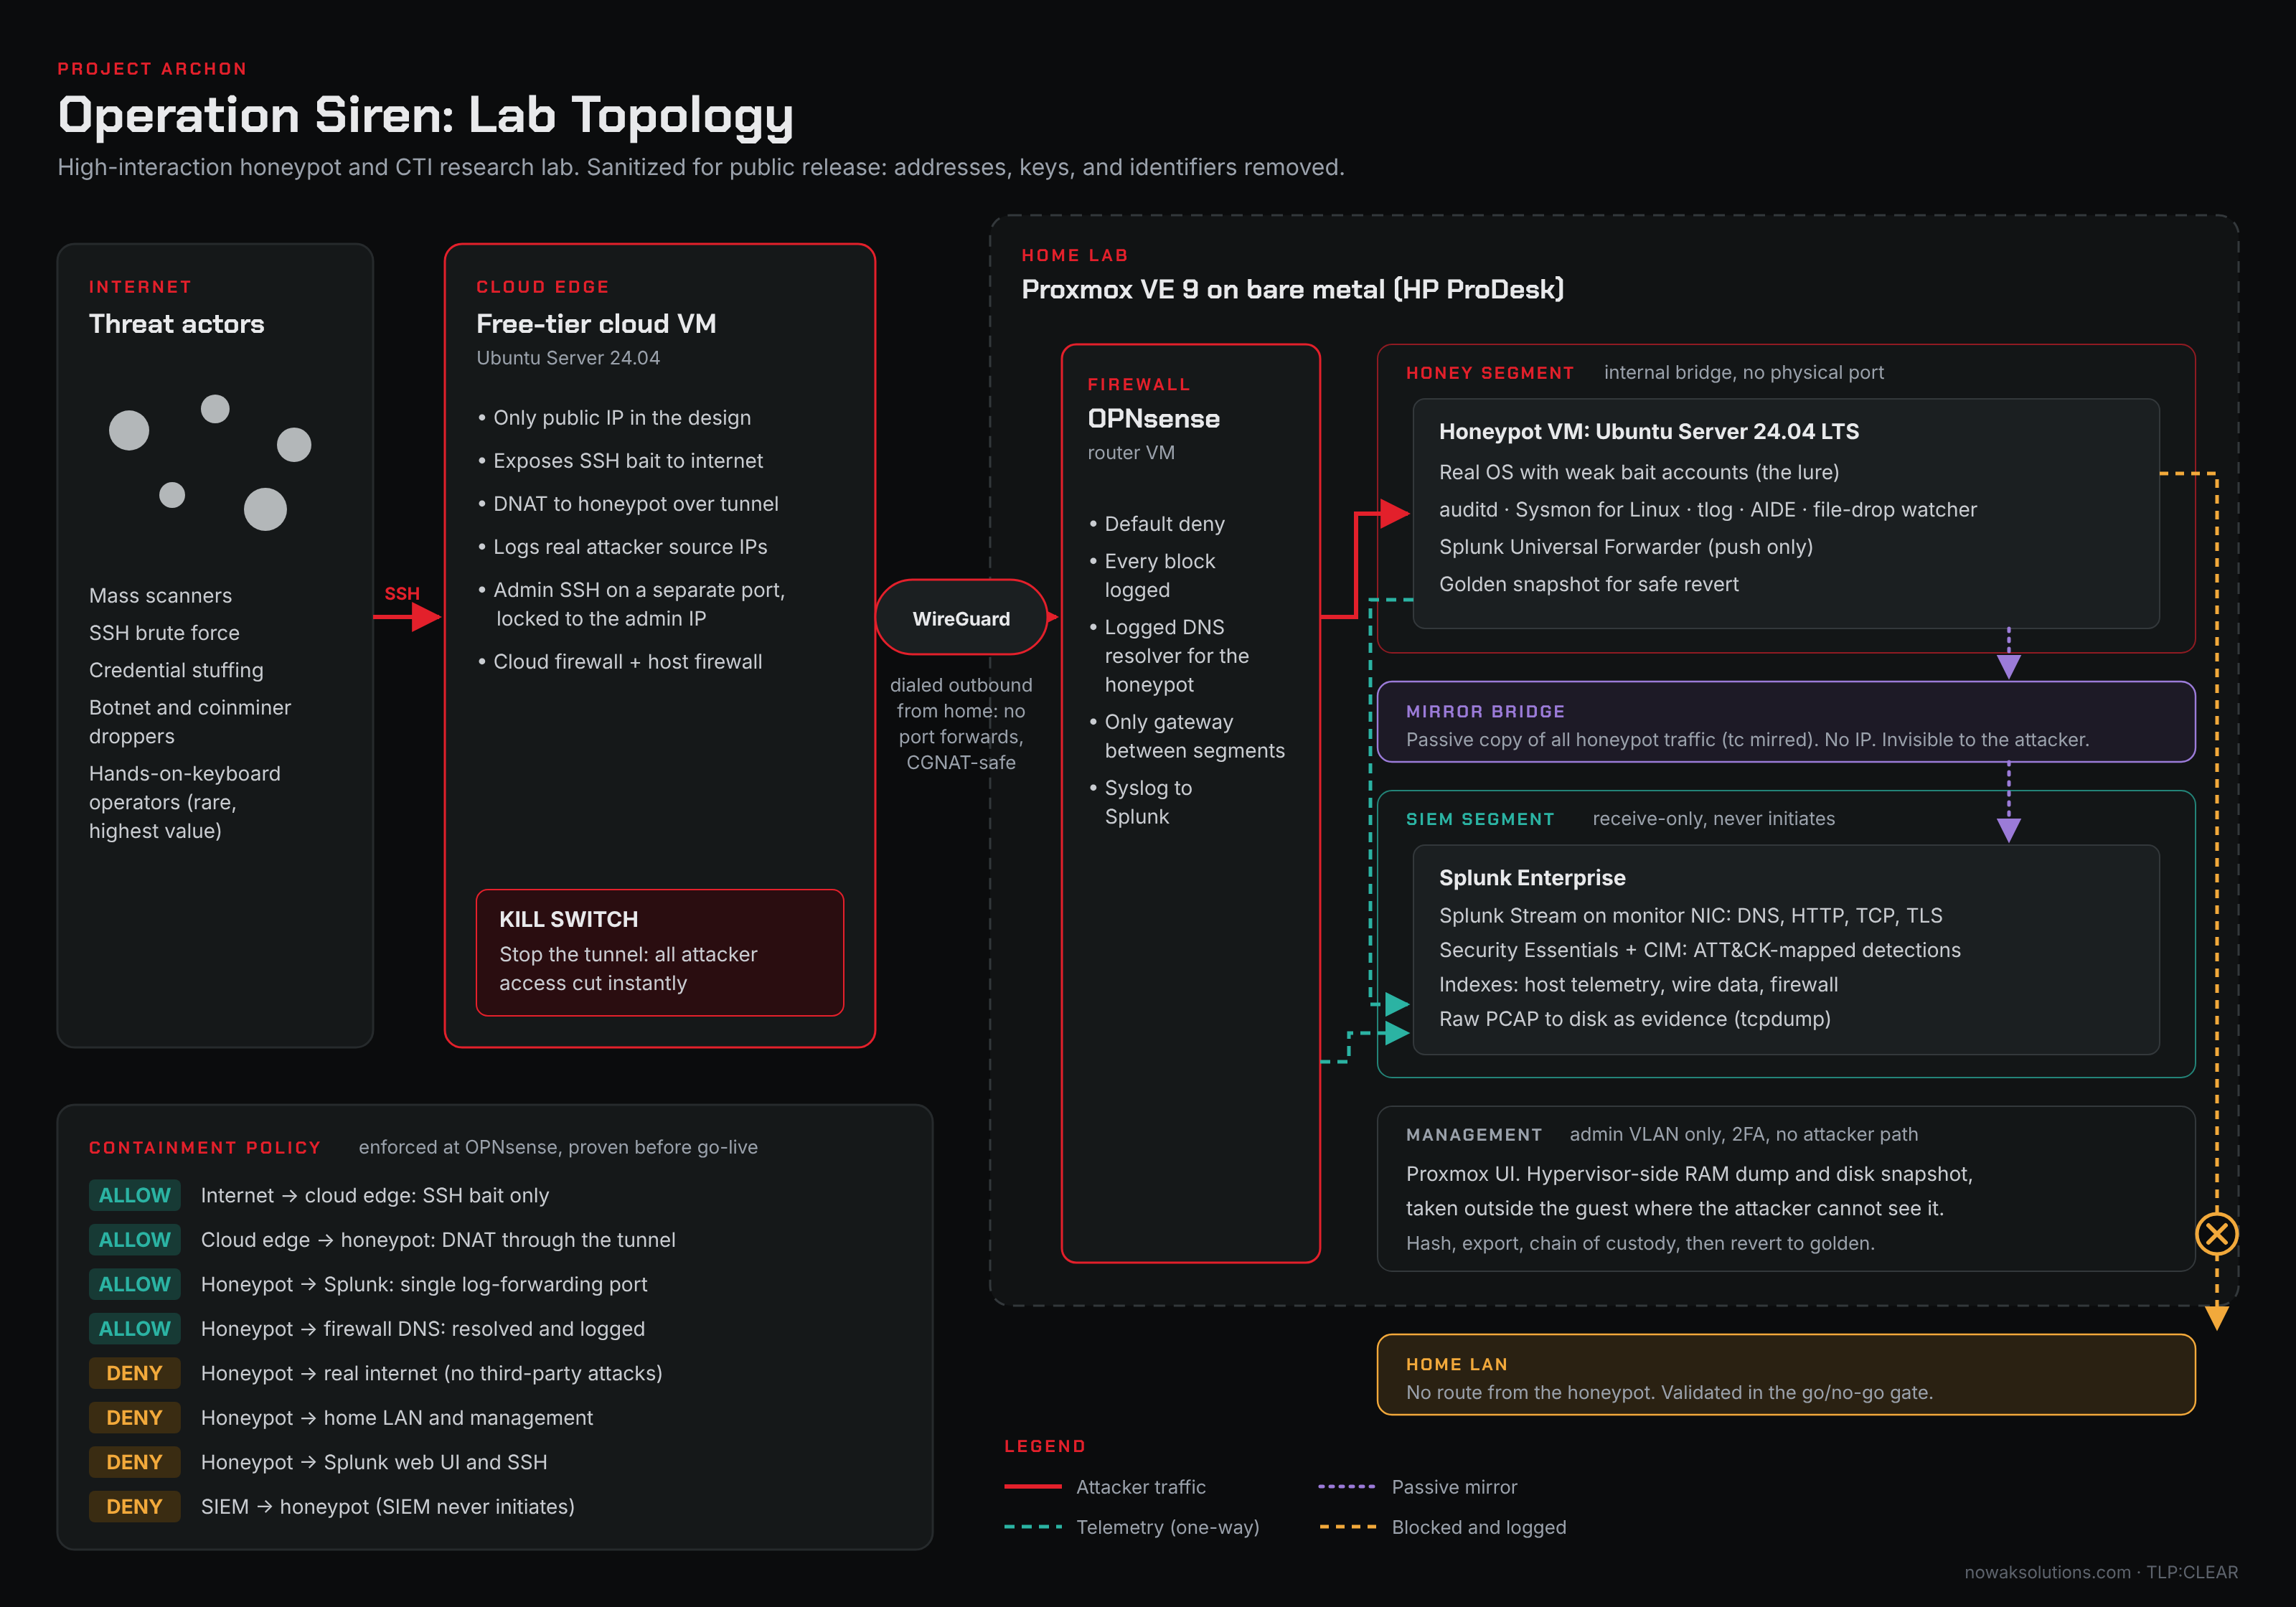
| Zone | What Lives There | Allowed to Talk To |
|---|---|---|
| Internet | Scanners, botnets, brute-forcers, the occasional human | Cloud edge, exposed service only |
| Cloud edge | Free-tier VM: the only public IP, WireGuard endpoint, DNAT | Honeypot, through the tunnel |
| WireGuard tunnel | Encrypted transit, initiated from home | Edge and firewall only |
| OPNsense | Firewall and router VM, default deny, logs everything it blocks | Routes to the honeypot; ships logs to Splunk |
| HONEY segment | The honeypot VM | Splunk log port and firewall DNS only |
| MIRROR segment | Passive copy of honeypot traffic, no IP | Read by the network sensor only |
| SIEM segment | Splunk, Splunk Stream, PCAP evidence | Receives logs; initiates nothing toward the honeypot |
| Management | Proxmox UI on an admin VLAN, 2FA | Home admin network only; no attacker path |
Key Design Decisions
The cloud edge holds the only public IP. Nothing at home listens on the internet. The exposed surface is a disposable free-tier VM that I fully control and can kill in one command.
The tunnel runs outbound from home. OPNsense dials out to the cloud VM. The home router needs no port forwards, and it does not matter if the ISP uses CGNAT. From the ISP's point of view, the home connection is a VPN client, not a server.
The network sensor sniffs a mirror, not the honeypot. If the capture agent ran inside the honeypot, an attacker with root could see it, blind it, or feed it garbage. A passive copy on a separate bridge with no IP is invisible to the attacker and keeps recording after the host is owned.
Memory and disk capture happen from the hypervisor. Proxmox can dump the honeypot's RAM and snapshot its disk from outside the guest. The attacker cannot see or tamper with that capture, which keeps the evidence trustworthy.
Layered host telemetry. auditd sees syscalls, Sysmon for Linux sees
process and network context, tlog sees exactly what was typed, and AIDE knows what the
disk looked like when it was clean. If an attacker tampers with one source, the others and the network
sensor still hold the truth.
An all-Splunk SIEM, on purpose. I chose Splunk Enterprise with Splunk Stream for wire data instead of a Zeek and Suricata stack. The point was to learn the full Splunk platform end to end: ingestion, data models, SPL detection engineering, and Security Essentials. Zeek and Suricata remain an optional add-on, and raw PCAP is kept on disk as evidence rather than indexed.
Stack
Everything is free for lab use.
| Layer | Tool | Role |
|---|---|---|
| Hypervisor | Proxmox VE 9 | Type-1 hypervisor on a small-form-factor HP desktop |
| Firewall | OPNsense | Segmentation, default deny, logged DNS, WireGuard |
| Cloud edge | Oracle Cloud Always Free VM (Ubuntu 24.04) | Public IP, DNAT, kill switch |
| Tunnel | WireGuard | Outbound encrypted transit |
| SIEM | Splunk Enterprise | Indexing, search, dashboards |
| Wire data | Splunk App for Stream + streamfwd | DNS, HTTP, TCP, and TLS metadata off the mirror |
| Detections | Splunk Security Essentials + CIM | ATT&CK-mapped content, normalized data models |
| Host shipping | Splunk Universal Forwarder | One-way log push from the honeypot |
| Honeypot OS | Ubuntu Server 24.04 LTS | The lure |
| Host telemetry | auditd, Sysmon for Linux, tlog, AIDE | Syscalls, process context, TTY capture, file integrity |
| Evidence | tcpdump, Proxmox snapshots, guest memory dumps | Raw packets, disk state, RAM |
| Analysis | Volatility 3, YARA, Sigma CLI, CyberChef, ATT&CK Navigator | Forensics and detection content |
| Enrichment | VirusTotal, AbuseIPDB, GreyNoise, Shodan (free tiers) | Passive lookups only |
The Build, Phase by Phase
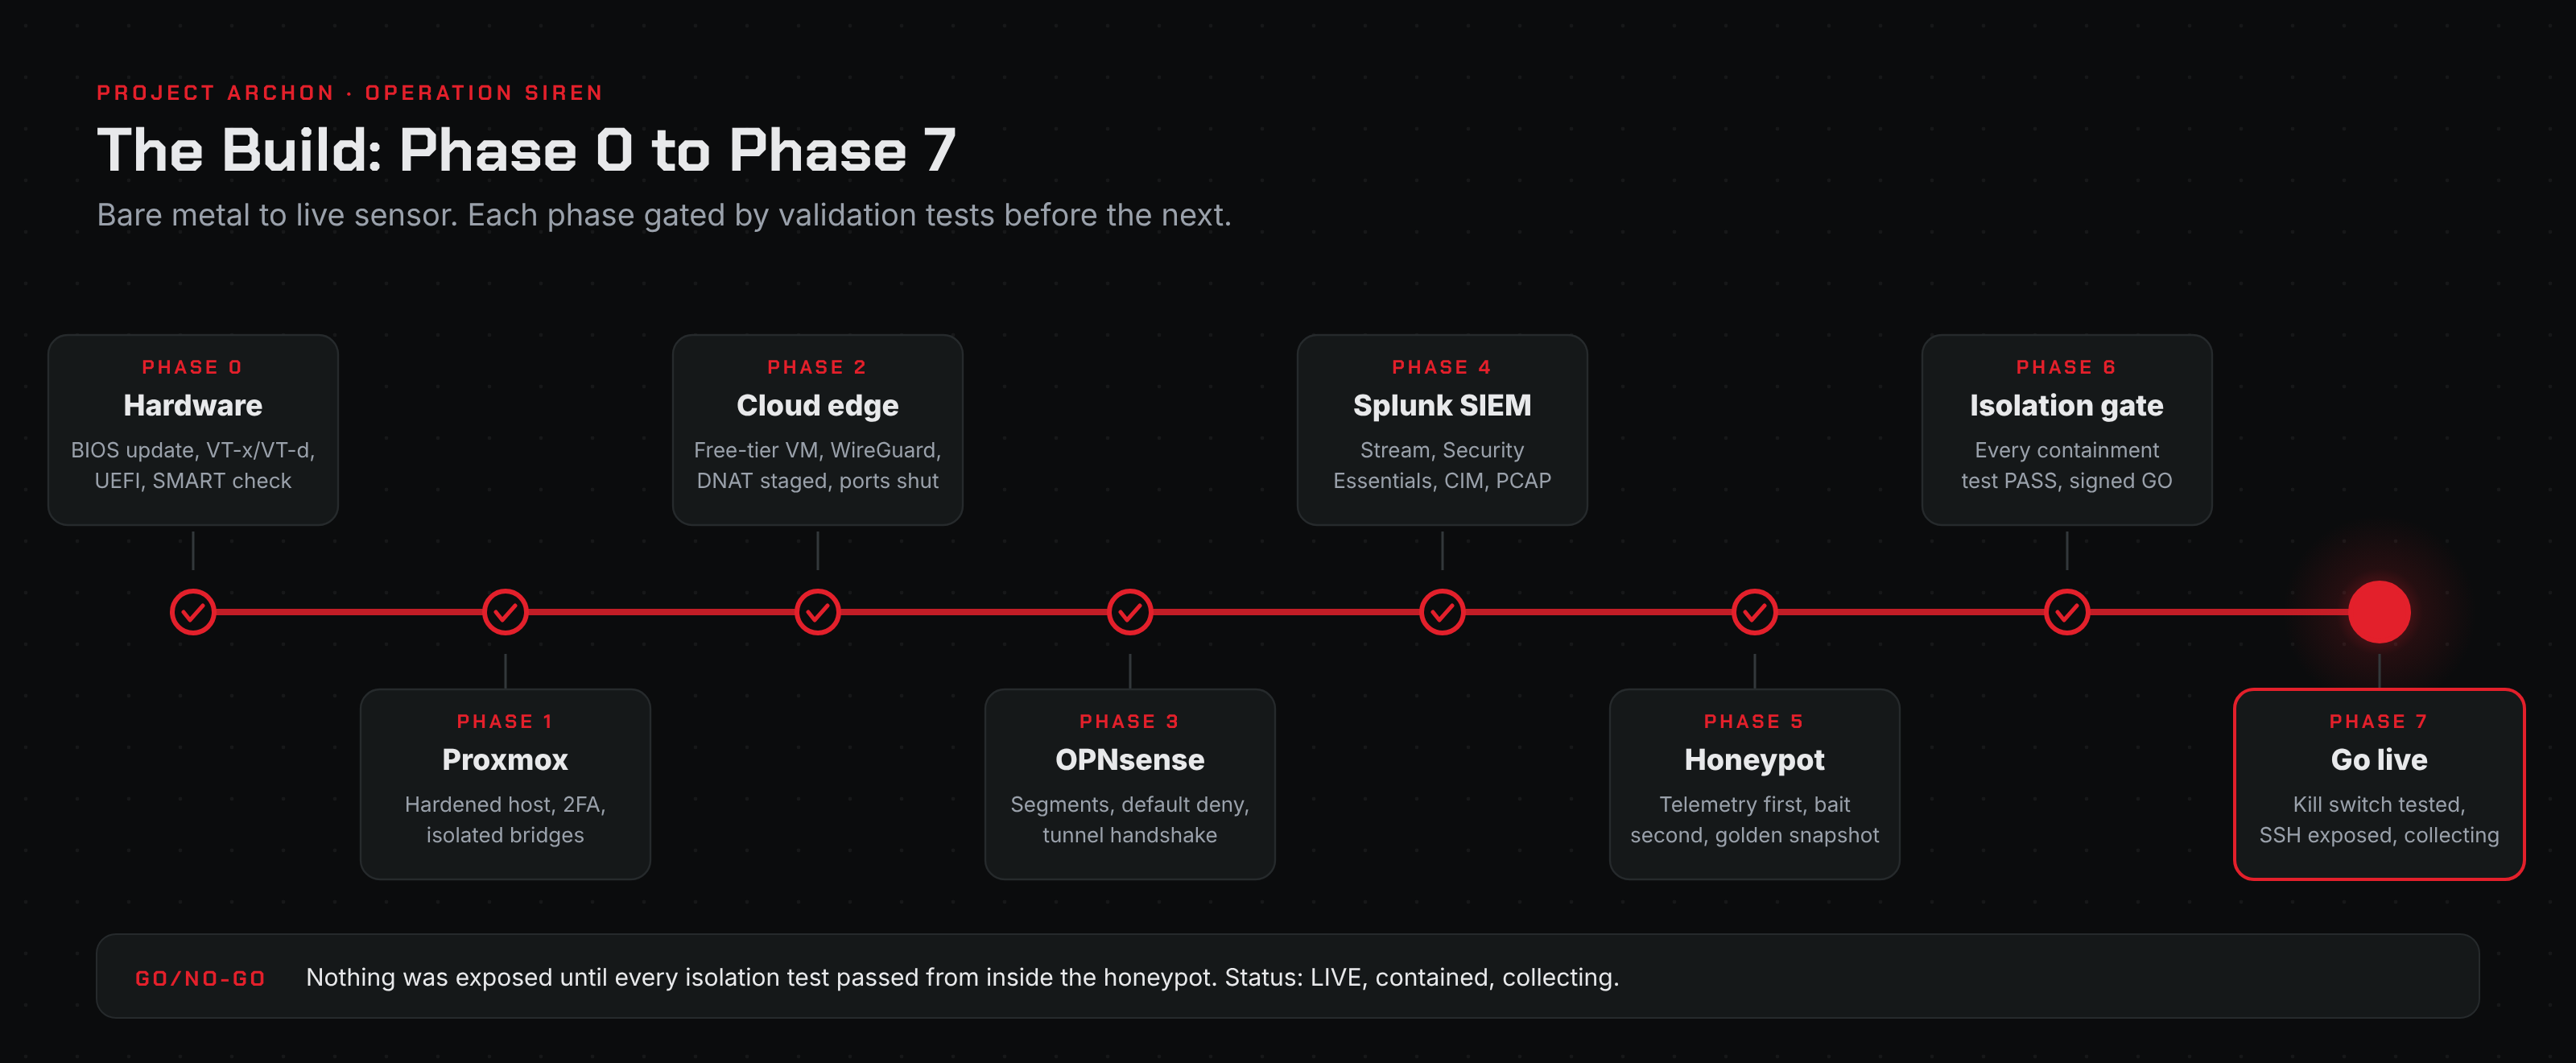
The lab book is written as eight sequential phases. Each phase ends with a validation table and a completion checklist, and later phases assume the controls from earlier ones.
Phase 0: Hardware and firmware. Updated the BIOS, enabled VT-x and VT-d, set AC power recovery so the host comes back on its own, switched to UEFI-only boot, built a Ventoy installer, and ran a SMART check before trusting the disk with months of capture.
Phase 1: Proxmox install and hardening. Moved to the no-subscription repositories, fully patched the host, created a non-root admin with TOTP 2FA, and locked the web UI and SSH to the management subnets with an input policy of DROP. Built three internal-only bridges (HONEY, SIEM, MIRROR) with no physical ports. Confirmed NTP sync, because every timeline in this lab depends on the clock.
Phase 2: Cloud edge and WireGuard. Stood up a free-tier cloud VM, locked its security list to WireGuard and an admin-only management port, enabled IP forwarding, and staged the DNAT rules. The honeypot ports stayed closed at the cloud firewall until go-live.
Phase 3: OPNsense and isolated networks. Installed OPNsense as a VM with legs on the uplink, HONEY, and SIEM bridges. Brought up the WireGuard tunnel from home to the cloud edge, confirmed the handshake, and built default-deny rule sets per segment with explicit, logged blocks toward private address space so any pivot attempt produces an alert-worthy log line.
Phase 4: All-Splunk SIEM and sensor. One VM with two NICs: one for management and ingest on the SIEM segment, one with no IP in promiscuous mode on the MIRROR bridge. Installed Splunk Enterprise as a non-root, systemd-managed service; enabled the forwarder receiver and a syslog input for the firewall; created separate indexes for host data, wire data, and firewall logs. Installed Splunk Stream pinned to the monitor NIC, scoped to DNS, HTTP, TCP, and TLS to stay inside the free-tier daily cap. Added Security Essentials, the Common Information Model, and host parsing add-ons. Raw PCAP rotates to disk as evidence.
Phase 5: Honeypot and telemetry. Built an Ubuntu Server VM on the HONEY bridge.
Installed and verified every telemetry source before weakening anything: auditd rules for exec,
identity files, persistence locations, privilege escalation, network connects, kernel modules, and
log tampering; Sysmon for Linux; tlog session recording; an AIDE baseline copied off-box while the
system was clean; and a file-drop watcher on common staging directories. The Universal Forwarder
pushes everything to Splunk over the one permitted path. Only then were weak bait accounts and
password SSH enabled, with my own admin access kept on a separate, key-only path that is never
exposed. A software port mirror on the host (tc mirred, persisted with a systemd unit
and a udev rule) clones both directions of the honeypot's traffic to the sensor. The VM was shut down
cleanly and captured as a golden snapshot.
Phase 6: Isolation and egress validation. The most important phase. Every containment control was tested from inside the honeypot, the way an attacker would test it, and the results were recorded in a signed go/no-go gate (next section).
Phase 7: Go live. Tested the kill switch first, while still closed. Moved the cloud VM's own admin SSH off the standard port so the bait could own it. Opened the exposed service at the cloud firewall, confirmed from an external network that it landed on the honeypot (the SSH host key differed from the edge, proving DNAT), and confirmed the session appeared in both the host and wire-data indexes. Exposure started with SSH only. Additional services come later, once bait for them exists.
The Containment Gate
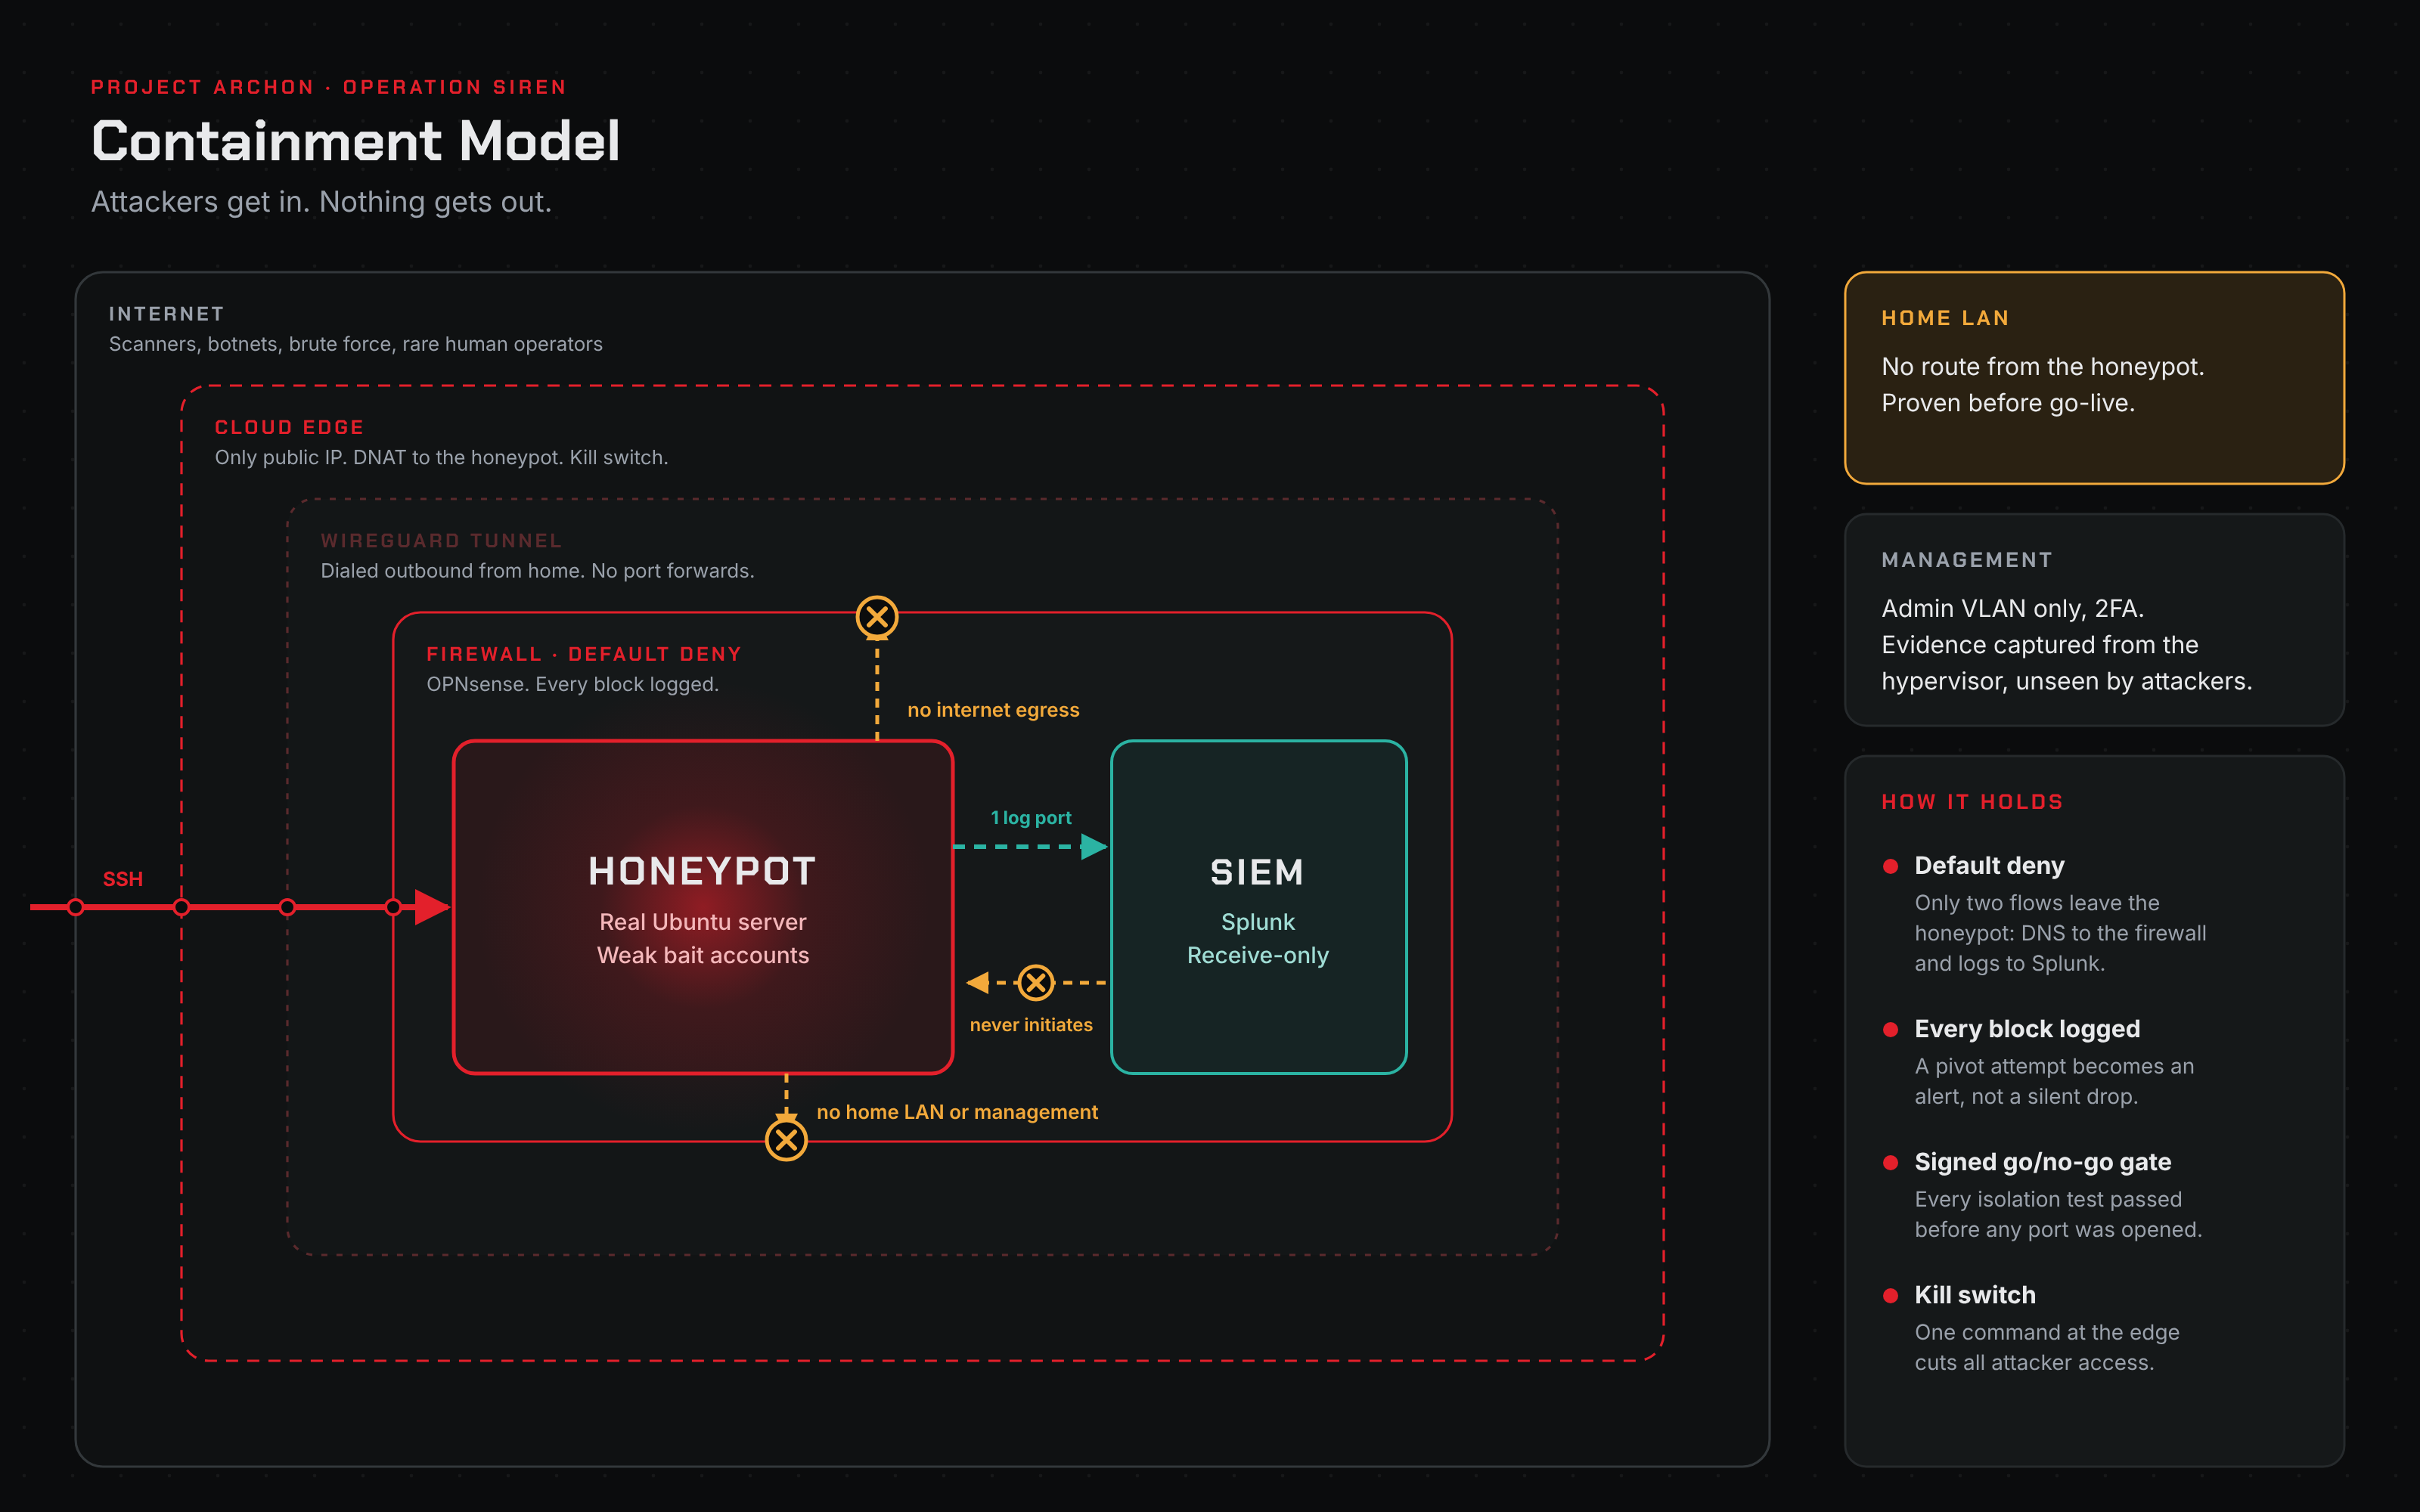
Nothing was exposed until every row passed.
| Isolation Test (From Inside the Honeypot) | Required Result | Result |
|---|---|---|
| Reach the home LAN | Unreachable | PASS |
| Reach the management network / Proxmox UI | Unreachable | PASS |
| Reach the Splunk web UI or SSH | Blocked | PASS |
| Real internet egress (ICMP and HTTPS) | Blocked | PASS |
| DNS lookups | Resolved and logged by the firewall, no onward connection | PASS |
| Splunk forwarder port | Open (the one allowed path) | PASS |
| SIEM initiating to the honeypot | Blocked | PASS |
| Telemetry still ingesting after lockdown | Both indexes receiving | PASS |
| External scan before go-live | Service ports closed | PASS (at go-live) |
Every blocked attempt was also confirmed in the OPNsense logs, so isolation failures would be loud, not silent.
Kill switch: one command on the cloud edge stops the tunnel and severs all attacker access instantly. Admin access to the edge is unaffected because it does not traverse the tunnel. Evidence stays intact because capture is hypervisor-side.
Plan vs As-Built
The lab book records what was actually built, including where reality diverged from the plan. These are the honest deltas.
Source IP preservation. The original design used DNAT with no source NAT so the honeypot would see each attacker's real IP. In practice, symmetric return routing across the tunnel was cleaner with masquerade on the tunnel interface. The trade-off: the honeypot and Splunk Stream see the tunnel address as the source, and the real attacker IP is recorded at the cloud edge. Next step: ship edge connection logs into Splunk and correlate on time and port so every session is attributable in one search.
Sinkhole. The plan called for a dedicated INetSim VM to answer malware's DNS and HTTP requests with canned responses. That VM would not cooperate at build time, so I pivoted: the honeypot's DNS points at the OPNsense resolver, which resolves and logs every lookup, while all real egress stays hard-blocked. C2 domains become intel, but connections go nowhere. INetSim can drop in later without changing anything else.
Exposure scope. The plan exposed SSH, Telnet, HTTP, and HTTPS. As built, go-live started with SSH only. Exposing ports with nothing convincing behind them adds noise and fingerprints the sensor. More services come online as real bait for them is built.
Linux Sysmon parsing. The Microsoft Sysmon add-on for Splunk parses Windows event XML, not the syslog format Sysmon for Linux emits. Linux Sysmon fields need their own extraction.
Lessons Learned
These cost me the most time. If you build something similar, start here.
- Splunk Stream "unrecognized link layer 253" / FATAL. It looks like a NIC or
mirror problem. It is not. Splunk runs as a non-root user, and the
streamfwdbinary needscap_net_rawandcap_net_adminto open the interface. Set them withsetcap, and re-run it after any Stream add-on upgrade, because upgrades replace the binary and drop the capabilities. - The Proxmox firewall silently eats mirrored traffic. With the per-VM firewall enabled on the honeypot NIC or the sensor's monitor NIC, the firewall bridge drops mirrored frames. Disable it on those two interfaces and let OPNsense do the enforcing.
- WireGuard handshake never completes. The cloud security list allowed the WireGuard port, but the VM's own host firewall was still dropping it. Cloud firewalls and host firewalls are two separate layers; check both.
- Interface reassignment in OPNsense wipes your assumptions. After reassigning interfaces from the console, the honeypot segment had no pass rule at all, so even a gateway ping failed. Re-verify rules after any interface change.
- Moving SSH off port 22 on Ubuntu 24.04. Changing
Portinsshd_configdid nothing until socket activation (ssh.socket) was disabled. Needed so the bait could own port 22 on the edge. - Restart Splunk the way it was started. A systemd-managed Splunk cannot be
cleanly stopped by the Splunk CLI as the splunk user. Use
systemctl restart. - Stream "Estimate" mode indexes nothing. It only measures volume. Streams must be set to Enabled and pointed at the right index.
- Validate before you weaken. Every telemetry source was proven to reach Splunk before the bait accounts existed. Finding a capture gap after the first real session is too late.
Operations
Daily 15-Minute Routine
- Confirm both indexes are still ingesting with no gaps.
- Review the last 24 hours of new source IPs and alerts.
- Confirm zero uncontained egress in the firewall logs.
- Check disk use against PCAP retention.
- Flag any hands-on-keyboard session for deep analysis.
Safe Revert Procedure (Always in This Order)
Dump guest RAM from the hypervisor.
Snapshot the disk and diff it against the golden baseline; run an AIDE check.
Hash and export every dropped or modified file to a chain-of-custody log.
Roll back to the golden snapshot.
Verify the baseline is clean before re-exposing.
Reverting first would destroy the memory image and dropped files, which are often the most valuable evidence.
Chain of custody. Every artifact gets a record of what it is, where it came from, its SHA-256, who handled it, and when (UTC), kept off the honeypot.
From Data to Intelligence
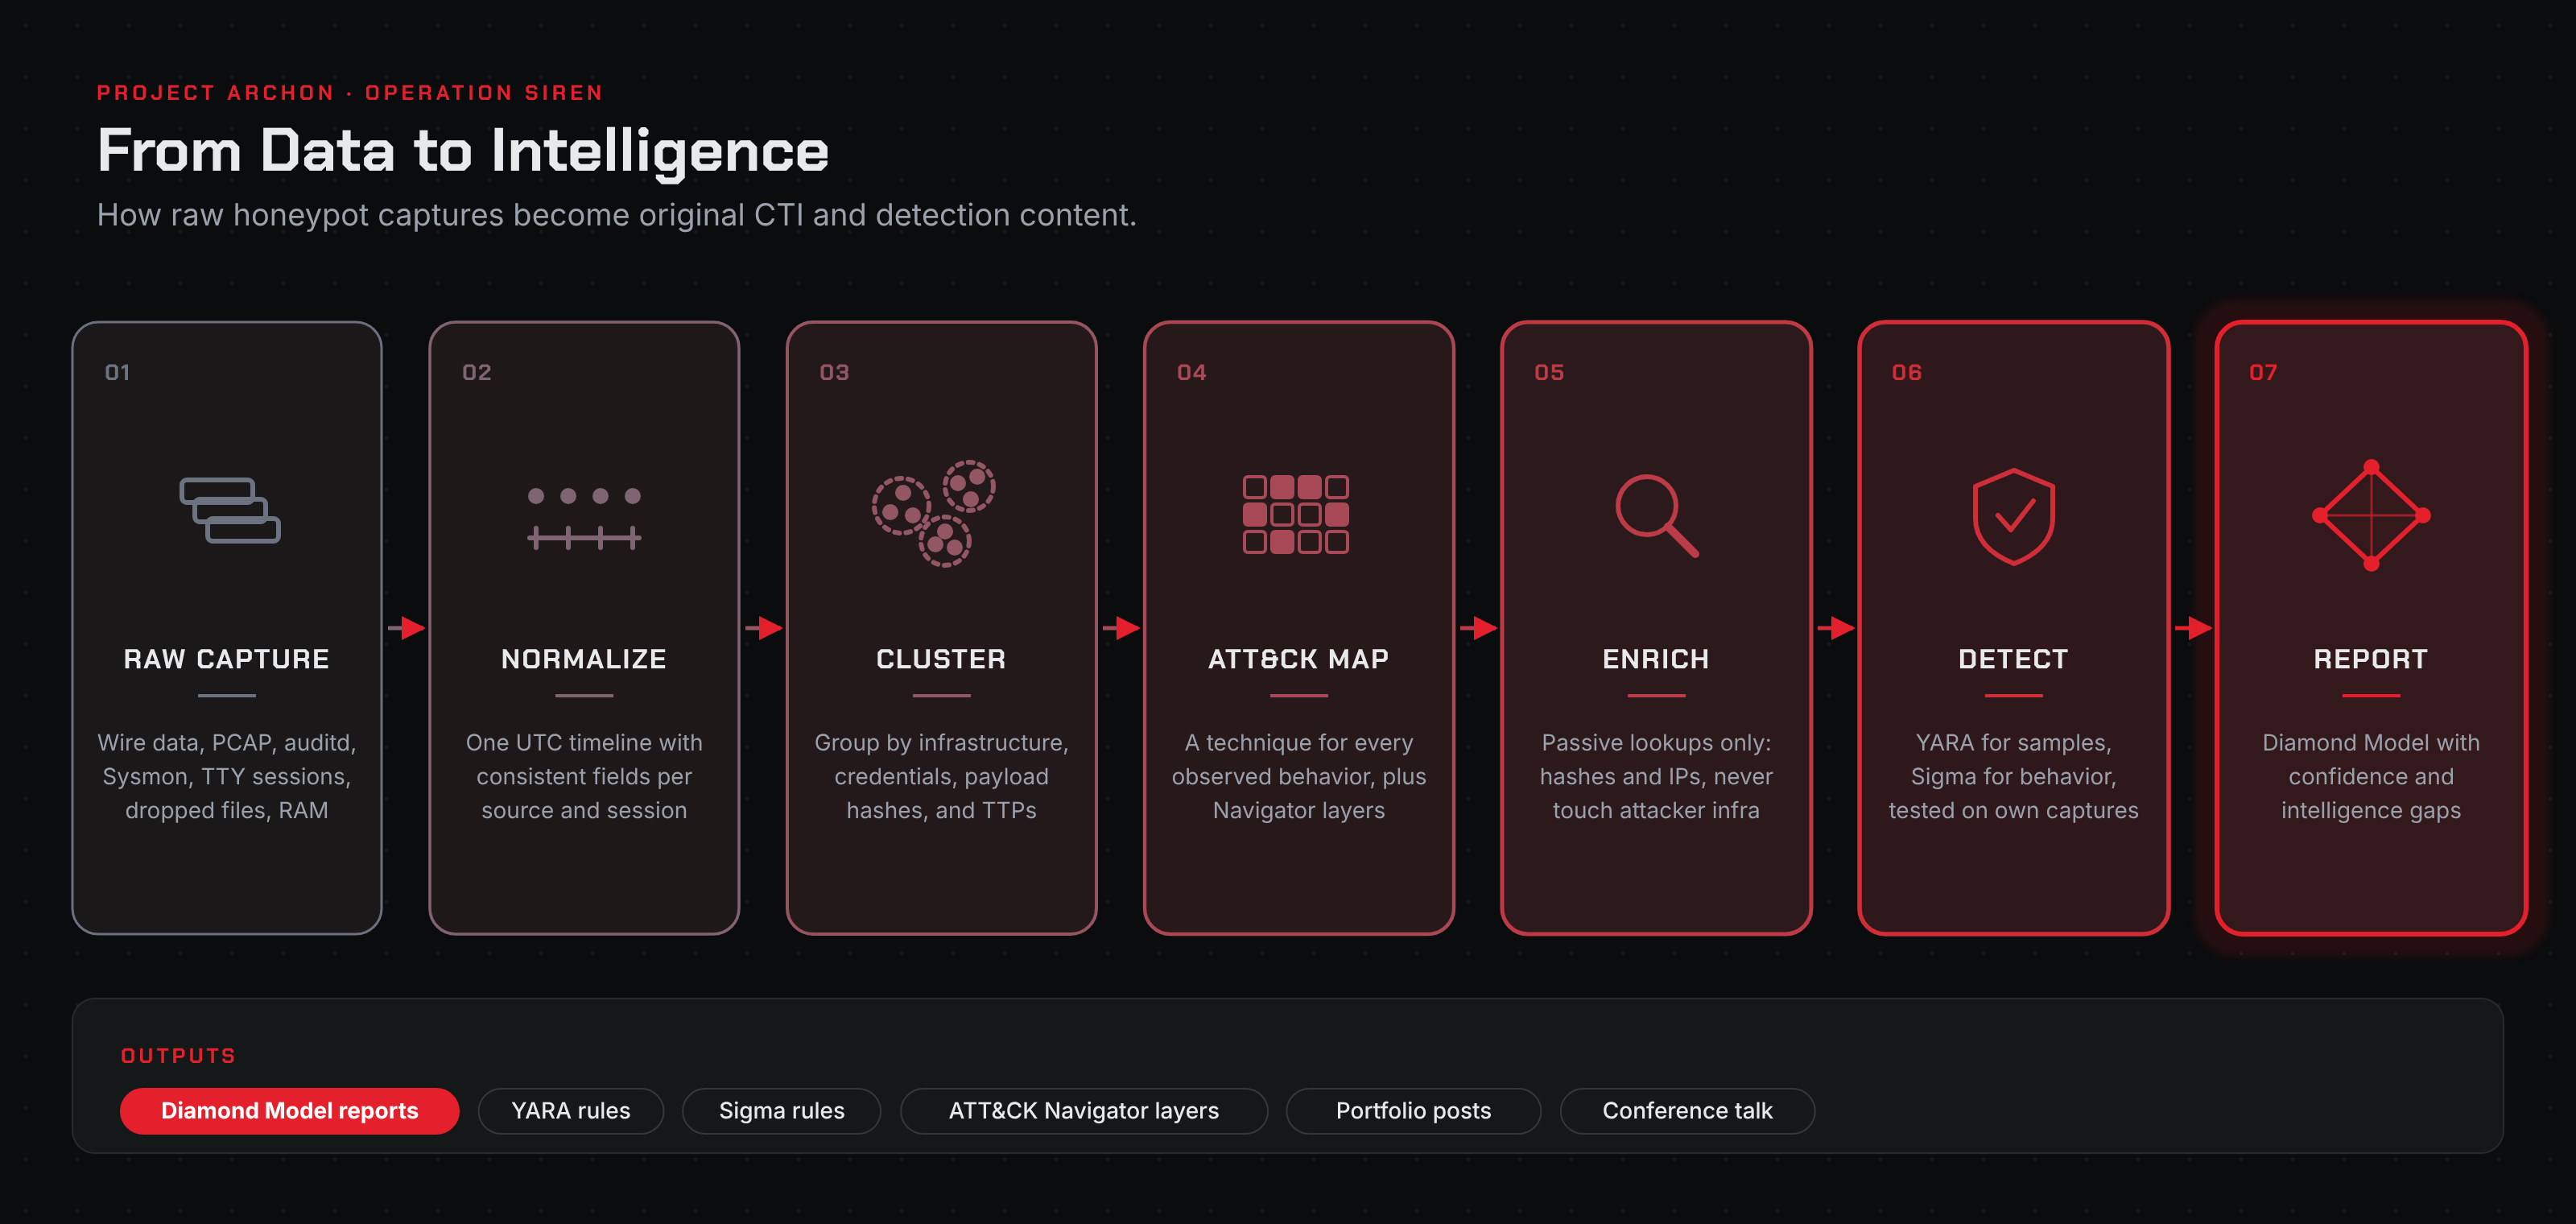
Pipeline
- Raw: wire data, raw PCAP, auditd, Sysmon, TTY recordings, dropped files, memory images.
- Normalize: one UTC timeline with consistent fields (source, session, host).
- Cluster: by infrastructure, credentials tried, payload hashes, and TTPs.
- Map: each behavior to a MITRE ATT&CK technique, with a Navigator layer per cluster.
- Enrich passively: hash and IP lookups only, never touching attacker infrastructure.
- Detect: YARA for samples, Sigma for behavior, validated against my own captures.
- Report: Diamond Model (adversary, capability, infrastructure, victim) with confidence and gaps stated.
What to Expect
Mass scanning within minutes, SSH brute force within hours, first successful logins and botnet or coinminer drops within days, and, rarely, a human exploring interactively. The rare human sessions are the highest-value captures, so alerting is tuned to surface them above the brute-force noise.
90-Day Plan
| Weeks | Focus | Deliverables |
|---|---|---|
| 1 to 2 | Capture gaps and noise tuning | Verified capture checklist, tuned SPL alerts |
| 3 to 6 | Payload triage and quick-turn findings | Triage sheet, first YARA rules, first post, Sigma set v1 |
| 7 to 12 | Clustering and full reporting | ATT&CK layers, two Diamond Model reports, detection pack, talk draft |
Rules of Engagement
- No hack-back. Never attack, exploit, or retaliate against an attacker.
- No active scanning of attacker infrastructure. Enrichment is passive only.
- Hash before upload. Submitting a sample to a public service can tip off its operator; query by hash first.
- Cluster-level attribution only. No naming individuals and no nation-state claims without extraordinary evidence.
- Contained by design. Egress controls keep the honeypot from ever being used against third parties, which also keeps the lab within the cloud provider's acceptable use policy.
- Illegal content. If clearly illegal material is encountered, stop handling it, do not copy or distribute it, and contact the appropriate authorities.
What's Next
- Correlate edge connection logs into Splunk for full source attribution.
- Bring up INetSim for fake-service responses to second-stage downloads.
- Build bait for Telnet and web services, then widen exposure.
- Add Zeek and Suricata for JA3/JA4 fingerprints and signature alerts.
- Publish the first findings post and the first Diamond Model report.
This writeup is published for defensive security research and education. Run anything like it lawfully, contained, and at your own risk.